Hi all!
This is the first post
from a series of how using Couchbase with Apache Spark.
In this post I will explain how to set up the environment, and how to use Spark
with Couchbase in the simplest form.
In the next posts we
will continue on to the SparkSQL with N1QL world, and the exciting Spark
Streaming with DCP and more.
Our world, "Big Data", is divided.
As obscure as Big Data may
sound – and is, there are 2 major parts on every data analysis.
The first is the
operational side, That is what you need in order to get the work done – in real
time those are Databases such as Couchbase.
The Second part is the heavy
lifting of aggregation large amount of data,
those are platforms such as Apache Hadoop or Spark.
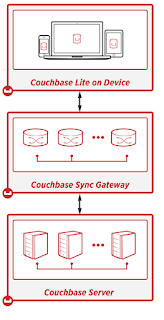
Couchbase integrates with
both in order to achieve the full solution, In that post and in others to follow –
I will work you through how to do you first steps and more, integrating
your Couchbase server – with Spark – with ease.
I'm assuming that you
already know at least a little bit on Spark,
But if not – in one sentence Apache
Spark is an open source cluster computing framework.
It’s main Data structure
call RDD and I’m encouraging you to read the Spark developer guide.
The demo we are going to
build will be in Spark “Native” language, which is Scala,
Don’t panic, that is fairly simple!
Software needed:
Scala: 2.10.4
(important!)
So first thing first.
If you already know Spark
or Scala you can skip the set up phase.
Setting up the Project
Let's open the IDE and
start a new project of type Scala with SBT
Hit next and choose the
name of the project, Project SDK (at least 1.7) SBT version (whatever you have
it’s fine, here I’ve used 0.13.8) and the Scala Version as 2.10.4 (any 2.10
will be fine).
Check the auto-import and click finish.
Next, set up the build.sbt
file under the module root.
SBT stands for Scala Build Tool, and function also as a dependencies resolver,
A bit like Maven. It also connects to the same repository as Maven.
After you define the properties on this file, the SBT plugin will download the
required dependencies.
The simple structure or
the SBT is as follows:
1) name of the project “name := someProjectName”
2) version of your
project “version := 1.0”
3) Scala version which
you’ll be using “scalaVersion := “2.10.4”
4) list of dependencies (from
maven repository)
“libraryDependencies ++= Seq( “groupId” % “artifactId” % “revision”)”
our sbt file will look
like that:
name := "SparkCouchbase"
version := "1.0"
scalaVersion :=
"2.10.4"
libraryDependencies ++=
Seq ("org.apache.spark"
% "spark-core_2.10" %
"1.5.1",
"org.apache.spark"
% "spark-sql_2.10" %
"1.5.1",
"org.apache.spark"
% "spark-streaming_2.10" %
"1.5.1",
"com.couchbase.client"
%% "spark-connector" %
"1.0.0")
note: the double
%% means that the Scala version will be taken from the variable defined in
scalaVersion
the dependencies are as
follows:
- The Spark
code dependency compiled for Scala 2.10 in version 1.5.1
- The Spark SQL dependency compiled for Scala 2.10 in version 1.5.1
- The streaming
for Spark compiled for Scala 2.10 in version 1.5.1
- The great Couchbase
connector to Spark, compiled for Scala 2.10 (from the scalaVersion) in version
1.0.0
for more about dependencies look here
Next, we need to take
care on the directory structure.
If we don’t set the correct structure, the SBT plugin won’t be able to compile
our project.
So create new Directory
under the module named src/main/scala,
and mark the Scala folder
as sources (bluish colored).
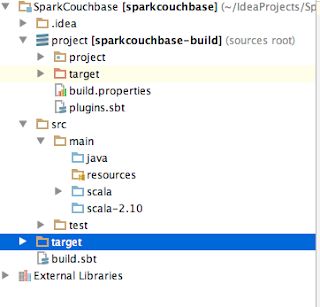
Your project structure
should look more or less as follows:

Now after we set
everything up it’s time for some coding!
Coding
Finally, some coding.
After you see that the little
bar of the sbt has finished downloading the dependencies package you can start
writing your program.
First make sure that you already
have the Couchbase server installed with the travel-sample bucket.
Now, create a new Scala
Object in the Scala source folder with the name of your liking,
I chose
SparkCouchbase.scala
Next, create a main
function so your code will look like that
 object SparkCouchbase {
  def main(args: Array[String]): Unit ={

  }
 }
So far, what we’ve
created here is an Object (think of is as a singleton class), and a method main
which gets an array of String and return Unit (which is basically nothing)
Now we need to add the
sparky flavor.
In order to do so, we
need to add some imports that were downloaded earlier by the SBT auto import.
We need the basic spark package
import org.apache.spark._
we need the basic Couchbase
to spark connector package
import com.couchbase.spark._
and Json document and
object extension packages
import com.couchbase.client.java.document.JsonDocument

import com.couchbase.client.java.document.json.JsonObject
4 imports in total, plus
we need the spark init and configuration, which defining the application name,
spark cluster location, what bucket we want to connect to in Couchabse, or the
node addresses.
Finally, we must have the
SparkContext, in order to use spark framework
so our code will look
like that,
please not, if you don’t
specify a bucket – the connector will go to the default bucket, and if you don’t
specify an address for the nodes, it will try to find Couchbase in the
localhost (127.0.0.1).
 import org.apache.spark._
 import com.couchbase.spark._
 import com.couchbase.client.java.document.JsonDocument

 import com.couchbase.client.java.document.json.JsonObject

 object SparkCouchbase {
  def main(args: Array[String]): Unit ={
    val sparkConf = new SparkConf().setAppName("CouchbaseTricks")
                    .setMaster("local[*]")
                    .set("com.couchbase.bucket.travel-sample","")
                    .set("com.couchbase.bucket.default","")
                    .set("com.couchbase.nodes","127.0.0.1")

    val sc = new SparkContext(sparkConf)

  }
 }
So we set the app name,
CouchbaseTricks, the cluster (local cluster-testing with x number of nodes as
the number of cores), which buckets we want to connect to (travel-sample,
default) and the nodes in the cluster.
Now we need to do
something with it. Like Getting some documents.
We will do it using the
couchbaseGet from the context.
Let’s get some major
airports: Heathrow, SF international and Los Angeles international and others,
and print their code and name with country.
Then save it back to Couchbase,
default bucket, as our major airports.
We will use two methods
from the Couchbase connector, the couchbaseGet and saveToCouchbase.
The first get a scala
sequence of documents from Couchbase and parallelize them (making them an RDD),
this method under your spark context.
The Latter saves an RDD to Couchbase.
Let’s look at the code
and break it down a bit
   val airportsSeq = Seq("airport_507", "airport_3469", "airport_3484", "airport_3797", "airport_3576", "airport_502", "airport_1382") // Heathrow, SFO, LAX, JFK, MIA, LGW, CDG
   val airports: RDD[JsonDocument] = sc.couchbaseGet[JsonDocument](airportsSeq ,"travel-sample" )

   val airportsByCountry = airports.map(airport => (airport.content().getString("country"), 1)) // map
   val majorAirportCount = airportsByCountry.reduce((a,b) => ("Total airport Number", a._2 + b._2))

   airports.map(myDocument => {
    val id = "mymajorairports::2015::" + myDocument.id()
    val content = JsonObject.create().put("name", myDocument.content().getString("airportname"))
                     .put("country", myDocument.content().get("country"))
                     .put("code", myDocument.content().getString("faa"))
    JsonDocument.create(id, content)
   }).saveToCouchbase("default",StoreMode.UPSERT)
So now we've just wrote our first Spark application with Couchbase (or maybe ever!).
Simple Spark init, simple reduce function, with get and set to the Couchbase cluster.
Next time, on those foundations, we will build another a bit more complicated solution.
Roi.


